Once my speaker has been designed I can start the manufacturing of the product. My Corel drawing crd is then exported as a dxf file. ready for CNC routing.
Here is the dxf that is being cut out. The file is loaded onto the CAD/CAM computer several checks are run to inspect the file for flaws such as gaps etc. All being well the router is aligned and the file exported. The MDF is screwed onto the flatbed to be routed out.
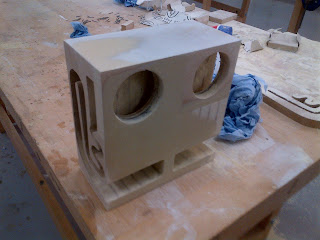
The pieces of MDF are then chiseled out and sanded down by hand. These are then glued together in a jig using PVA glue. I try to glue all the pieces in one go. However when doing so I lose the accuracy of alignment.
All the Pieces are then glued together in segments, including the middle section to increase the strength and integrity of the product and produce a divide between each speaker.
Then the two panels housing the speakers are cut to size using a set square and a band saw I then consider the best way to cut out the apertures for my speakers. Following a discussion with the technicians they advise a new piece of kit called a hole saw, this is attached like a drill bit onto a pillar drill this bores out the hole. In hind sight I would have been better CAD/CAM-ing this part along with the others.
I select the 64mm bit as this will house the rear of the speaker yet it shall sit on the surface as of the lip of the speaker is a larger diameter.
Once all pieces are joined I proceed to apply wood filler. I apply fine layers as I have been advised to do so by colleagues as this makes it neater and easier to sand. I also found using a squeegee to apply the filer gives a better finish.
After each application I sand back for a smooth surface optimum for painting.
Many hours later er have a smooth surface ready for paints. Prior to painting I create cavities for my switches to be situated and cables run along.
I use a 20mm Forstner Bit and drill down 30mm to house my illuminating rocker switch (red to match my colour scheme) and drill two 8mm holes for my cables (Power and Aux in) the plan being that LED holders will contain my cables.
Now that my surfaces are ready I can apply Sanding Sealant and my first coats of primer.
Following a review of my speakers it became apparent that the base of the horn had an undesirable texture. It was not smooth nor textured it looked unfinished, my tutor advised that I could use a rasp file to create a linear pattern but decided this would take away too much of the material, we also considered a material like wet and dry paper as this would give an interesting texture and aesthetic. In the end he had some interesting wave shaped foam, I like how the foam pays reference to sound waves and contrasting textures is a style I like.
I discussed how best to paint the foam with the spray room technician, he said that it would need to be glued in place prior to spraying as it will crack when being bent into place.
After priming I apply several coats of the matt black paint. I am happy with the colour and believe the ribbed texture looks great in this colour.
I now move onto my acrylic side panels. following i trip to Hindleys design supplies I discover a red frosted plastic which I know will be perfect for my speakers it will reveal enough of the horn yet hide the cables and circuit board it also has a lovely florescent edge.
I then Move onto attaching the plasic to the wood. I have been pondering this for a while, i have considered gluing, clamping in place the use of magnets and many more solutions. However i decide the screwing the ides in place would be the best option so i can remove the sides at any point for the addition of electronics yet maintain a sturdy lock. I will have to be careful that upon screwing I do not crack the body. In order to do this I take as many precautions as I can. These include-
Laser cutting location holes in the plastic
Screwing by hand
Using small screws 12mm.
It also came to my attention that having screws might be unsightly and look out of place, I contemplated getting black screws but could not find any or have time to paint them. I found some sunken washers that the screws sit in very nicely.


No comments:
Post a Comment